Showing posts with label CSS and Dreamweaver. Show all posts

Sunday, February 27, 2011

CSS in Dreamweaver Customize Web Button and Text Field

,
To do this, open your Adobe Dreamweaver.

1.  Create a Button and Text Field by Clicking the Button and Text Field in the “Form Tab”.

2. After clicking the Button and Text Field put an ID using any ID name you want and press OK and do the same to both Button and Text Field.

3. After creating a Button and Text Field, Go to CSS Panel Group > Click CSS Style Tab > Click All Button (Show All Document Mode). See Image below:


4. On the Style Definition Area, Right Click and Select “New” to create a New CSS rule, a New CSS Rule Window will appear.


On the New CSS Rule window follow the image below:


Click OK and Save the New CSS File using any filename you want.

5. After Clicking Save Button, a CSS Rule Definition Window for the Selector Name you typed will appear. In this project, I put “.fieldbuttonstyle” as my Selector Name. It is very important to put a “dot(.)” before the selector name in customizing buttons, fields, and other FORM OBJECTS. Below is the CSS Rule Definition Window Image.


This is where you can put different styles on buttons and fields like font style, border, font size, background color, images, alignment, and so on.

Let say:

FONT STYLE: Arial, Helvetica, San-Serif
FONT SIZE: 12 pixels
BACKGROUND COLOR: #0066FF
BORDER:  SOLID(Top, Right, Left, Buttom), WIDTH(Thin), COLOR(#CC6600)

After setting up the definition click “OK” button.

6. To apply the CSS Style, click the button or text field then on the bottom part, in the Property Panel, click the Class Drop Down Box and select the Selector Name you created. See Image Below:


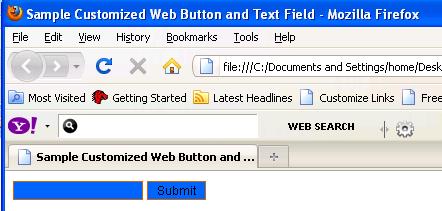
7. After applying the CSS Style, click Save and Run the Project by Clicking F12 and you will see something like this:

Read more

Monday, November 15, 2010

Starting CSS in Dreamweaver

,
To start with CSS in Dreamweaver, we must open our Adobe Dreamweaver application first. Adobe Dreamweaver is a web page editor that allows you to create and edit different kinds of web pages like PHP, HTML, CSS, JAVA Script, ASP VBScript, XML, Cold Fusion, JSP, and many more. This tool is very powerful yet easy-to-use because of its drag and drop function and it is also equipped with cool tools and plugins like flash button, flash video, flash paper, and a lot more which can easily be inserted into your web page.

The Figure 1 below shows the start of Adobe Dreamweaver where you select what web development language you want.
Figure 1. Start of Dreamweaver

The next step we need to do is to open HTML on the Create New column. We need to remember that in using CSS to format a page, we need to consider two separate things “content” and “presentation”. The content of your page—the HTML code—resides in the HTML file and the CSS rules defining the presentation resides on another file an external style sheet or sometimes in another part of HTML document usually at the head section. Figure 2 shows CSS rules which are placed in another file with a “.css” extension (external style sheet). Figure 3 shows CSS rules which are placed inside an HTML file inside head tag.

Figure 2. CSS rules in another file.

Figure 3. CSS rules inside HTML file

After opening HTML, you will see a blank white page. Now there are four important areas that must be visible in the working area. These are the area you will be using always in creating a web page using CSS. See Figure 4.

Figure 4. Four important areas in creating web page using CSS

Area 1 – This is the area where you can add objects to your page like buttons, images, flash objects, iFrame, and many more. In formatting a page using CSS we will be using “Div Tag” which is found in the common tab. See Figure 5 below:

Figure 5. Div Tag under common tab

Area 2 – Area 2 is the area where you can add CSS rules after inserting a Div Tag. This area can be enable or disabled in the Window menu bar, click Window on the menu bar > Check or Uncheck CSS Styles.

Area 3 – This is the area where you can align text, set link property, set text color, set background color, set font style and size and so on in the whole page. This area will play an important role along the way of your project.

Area 4
– This is the area where you can save, open, and create new projects. You can also print, cut, copy, paste, and undo or redo your codes if you want.

You need to remember the four areas of Dreamweaver in creating Web Page using CSS.
Read more

Sunday, October 17, 2010

Create CSS Rule in Dreamweaver

,
Before we create CSS rules, we must know first what CSS rules are so that we will not be confused along the way.

CSS Rules are set of instructions that controls objects in your web page. This involves text color, font style, font size, alignment, margins, and so on. CSS rules consist of two parts the selector and the declaration (or in most cases, a block of declarations).

Selector is a term such as “p” for paragraph, “h1” for heading 1, class name, or an id that identifies the formatted element.

Declaration block defines what the style properties are.

Example:
h1 {
font-size: 16 pixels;
font-family: Helvetica;
font-weight:bold;
}
Showing the example above, h1 is the selector and everything that is inside the braces {} is the declaration block. For now this is the basic thing you must know on CSS rules, you will learn more along the way.

So let us move on creating our first CSS rule. In Dreamweaver, there is no coding involved but however it is recommended that you must review your code so that you will have better understanding on CSS. Now to create a CSS rule, follow the steps below:

1. Open Dreamweaver and Create a New HTML file.

2. Under Common tab click Insert Div Tag which can be found on area 1. See Figure 4 on Starting CSS in Dreamweaver.

3. You will see an Insert Div Tag window. On the insert input, select “At Insertion Point” and on the ID put “sampledivtag” or whatever id name you want then click OK.


4. After you click OK button, you will see (Content for id "sampledivtag" Goes Here) which is inside in a dashed-bordered-rectangle. That rectangle is the div tag and the (Content for id "sampledivtag" Goes Here) is the content of the div tag. You can delete (Content for id "sampledivtag" Goes Here) and change in something you want like text, buttons, or even another div tag.


5. Inside the CSS Style window which is in Area 2 shown on Figure 4, right click and select New.


6. A New CSS Rule window will appear. Selector Type: has 3 options, choose “Advanced (ID’s pseudo-class selectors)”, don’t change the Selector:, Define in: choose “(New Style Sheet File)”.


7. Click Ok and Save Style Sheet File As “style.css”.
8. After saving the file “CSS Rule Definition for # sampledivtag in style.css” will appear.


In this area, you can now set #sampledivtag’s font style, size, weight, variants, backgrounds, margins, borders, and so on. After setting up, just click OK and you have a CSS Rule with an ID name #sampledivtag.

Output:

As you can see, only the #sampledivtag tag changed after we clicked OK. The whole page was not affected because the CSS Rule Definition defines only #sampledivtag and not the whole page.

Code Review:

What we did here is that we created CSS Rules in a different file and we name it “style.css”. The reason we did this is to clearly understand how CSS work because if we mixed CSS and HTML which is also possible, there is a possibility that you will get confuse of so many different codes. It is recommended to separate CSS from your HTML for easy debugging.

In CSS Rule Definition we set:

Font: Arial, Helvetica, san-serif
Font Size: 12 pixels
Font Style: Normal
Weight: Normal
Variant: Normal
Background: #FF9900

Open style.css or just click the tab next to your HTML file.


As you can see, #sampledivtag is our selector and everything which is inside our braces {} is our declaration block. If you review this post from top to bottom, you will see that CSS is not that complicated. So have fun with CSS.
Read more
 

Topic Central Copyright © 2011 -- Template created by O Pregador -- Powered by Blogger