Showing posts with label Visual Basic. Show all posts

Monday, February 28, 2011

Connect Visual Basic 6 to Microsoft Access 2003?

,
In this topic I am going to show you the simple way on how to connect Visual Basic 6 to Microsoft Access 2003. First you need to make sure that you have DAO 3.6 Object Library in your References.  Click or check it then click OK.

Open Visual Basic 6 > Click Project on the menu bar > References > Look for DAO 3.6 Object Library

DAO stands for Data Access Object which is already included if you install Microsoft Office 2000 and 2003. To know what Data Access Object is available in your computer, just look at the References.

Visual Basic 6 References

As you can see I have two Data Access Object (DAO) which are available in my computer, DAO 3.6 for Microsoft Access 2000 to 2003 and DAO 3.51 for Microsoft Access that is below 2000 like 98 or 95.

Code on how to connect Visual Basic 6 to Microsoft Access 2003:

con.ConnectionString = "Provider=Microsoft.Jet.OLEDB.4.0;Persist Security Info=False;Data Source=" & App.Path & "\data\database.mdb"

The Microsoft Database Access is located under a folder “data”.


Note: Always check the Visual Basic 6 references

So I hope this topic helps you. Please post a comment if want to ask something about this topic or if you have problems.
Read more

Tuesday, November 30, 2010

Visual Basic 6 Add, Edit, Delete, and Clear Records

,
If you are handling database add, edit, and delete are the common functions that you need to know and understand.

I am going to show you the simple way on how to create these functions in Visual Basic 6 using MS Access 2003 database. I am also going to add clear function which is use to delete all the records in the database in one click.

In this topic it is very important that you already know about How to connect Visual Basic 6 to Microsoft Access 2003, and the fundamentals of Visual Basic 6 and SQL code.

Add Function:

With rst
    .ActiveConnection = con
    .CursorLocation = adUseClient
    .CursorType = adOpenDynamic
    .LockType = adLockOptimistic
    .Open "Table1"
End With

With rst
    .AddNew
    .Fields!input = Trim$(StrConv(Text1, vbProperCase))
    .Update
    MsgBox Text1.Text & " Successfully Saved", vbInformation
End With

rst.Close
Set rst = Nothing

Edit Function:

rst.Open "select * from Table1 where id=" & Trim$(Label4.Caption) & "", con, adOpenDynamic, adLockOptimistic

With rst

    .Fields!input = Trim$(StrConv(Text1, vbProperCase))
    .Update
    MsgBox Text1.Text & " Successfully Edited", vbInformation
End With

rst.Close
Set rst = Nothing

Delete Function:

With rst

    .ActiveConnection = con
    .CursorLocation = adUseClient
    .CursorType = adOpenDynamic
    .LockType = adLockOptimistic
    .Open "Select * from Table1"

End With

With cmd

    .ActiveConnection = con
    .CommandType = adCmdText
    .CommandText = "delete from Table1 where id=" & Trim$(Label4.Caption) & ""
    .Execute
    MsgBox Text1.Text & " Successfully Deleted", vbInformation
End With

Clear Function:

With rst

    .ActiveConnection = con
    .CursorLocation = adUseClient
    .CursorType = adOpenDynamic
    .LockType = adLockOptimistic
    .Open "Select * from Table1"

End With

With cmd

    .ActiveConnection = con
    .CommandType = adCmdText
    .CommandText = "delete from Table1"
    .Execute
    MsgBox "Database Clear!", vbInformation
End With

The codes are simple and easy to understand. The only complicated parts are the edit and delete functions because we need to select the “id” of its input in order to execute edit and delete function properly. By using “id” which is our table primary key, we can edit and delete a record from the database specifically. Which means, if you have ten inputs in your database with the same value, you can specifically edit and delete one record; whereas if you use “input” instead of “id”, all the records with the same value will be edited or deleted?

You can download the whole program here: How to create add, edit, delete, and clear records from Microsoft Access 2003 Database


I hope this topic helps. Please post a comment if you have some problems or clarification.
Read more

Monday, November 22, 2010

Visual Basic 6 Tutorial Remove Spaces in a string using Trim

,
In this topic I am going to show you how to remove left space, right space, right and left spaces and all spaces in a string in Visual Basic 6.

In removing spaces in a string, all you need to do is to use “Trim” and “Replace” function. This is very important if you are dealing with databases.

Application:

If you have an input let say Company Name and you want the Company Name to be unique which mean no duplicate allowed. If you are not going to trim your input the tendency is it will create an error or the “no duplicate rule” will not be applied. Here is the reason why:

Assuming I already have Google Company in my database and I want no duplicate, if I input “_Google_Company_ _” it will also be accepted in the database because by putting spaces in the first and the last part of the string tells that they are not equal. To make it equal you have to use Trim.

Trim$(Input.text)

This will remove spaces both first and last part of the string. Here is the code.


Private Sub Command1_Click()
Text2.Text = LTrim$(Text1.Text) 'This will remove Left space or the first space
Text3.Text = RTrim$(Text1.Text) 'This will remove right space or the last space
Text4.Text = Trim$(Text1.Text) 'This will remove space both first and last
Text5.Text = Replace(Text1.Text, " ", "") 'This will remove all the spaces
End Sub
You can download the whole program here.

Screenshot:


Remember, this tutorial is very important in storing and retrieving data from database. This will help you compare two strings properly.

Microsoft Visual Basic Professional 6.0 with Plus Pack Microsoft Visual Basic 6.0 Learning Edition Microsoft Visual Studio 6.0 Professional Edition Microsoft Visual Basic 6.0 Enterprise Edition Development System Microsoft Visual Basic Professional Edition Mastering Enterprise Development Using Microsoft Visual Basic 6.0
Read more

Sunday, November 7, 2010

Visual Basic 6 Convert DTPicker Time and Date to Double

,
In this topic, you will know how to convert time and date to double using DTPicker in Visual Basic 6. This is very useful if you are making a Visual Basic 6 application that controls time and date. I was able to use this idea before when I created my Reservation System. In Reservation System you will be handling more on time and date like time in, time out, vacant time or date, and etc.


How did I use it?

In my Reservation System, I need to compare time and date using "if" function. What I did was I converted the time and date first in a textbox before I did the condition. In that way, I can easily trace and understand the flow of the program I’ve created. I can also use a ".value" directly to DTPicker EX.:

if DTPickerTime.value = DTPickerDate.value then

But I recommend that you convert it first, it is safer than using the ".value" directly.

Note: Upon reading this topic, I already assume that you already know the fundamentals of Visual Basic.

Download Source Code Here
Read more

Tuesday, October 19, 2010

Visual Basic 6 Transfer Text from Text Box to HTML Text Area

,
In order to transfer text from Visual Basic 6 text box to HTML text area, you need to view first the HTML source of the web page. I have created a simple web page with a text area and a button assuming that this is the web page we want to manipulate. You can download the whole program here. After downloading  extract the file > open the index.html > right Click on the web page and you will see a menu, select “View Page Source”.


On the page source, you will see the HTML code of the web page. The next thing you need to do is to find the name of the text area.


Based on the image, the name of the text area on the web page I have created is “content”.

Open your Visual Basic 6 editor and create a Standard EXE project. On the menu bar, click Projects > Components or you can press CTRL+T to open the components window > check the “Microsoft Internet Controls” > click Apply.


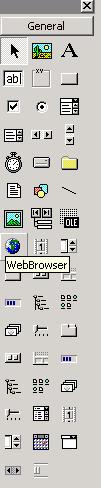
After clicking the apply button, you will see a web browser icon.


On your VB 6 editor, create an interface similar to this:


Name the button as “Command1”, Text box as “Text1”, and the web browser as “WebBrowser1”. Click the “View” button:


Copy and Paste this Code:

Private Sub Command1_Click()
WebBrowser1.Document.All("content").Value = Text1.Text
End Sub

Private Sub Form_Load()
WebBrowser1.Navigate ("Put your URL here or the URL of the web page you have created")
End Sub

If we interpret the code, it says whenever the application starts, the WebBrowser1 will navigate to the URL I specified ex. www.google.com or the HTML file I have created in my case my HTML file is located at:

file:///C:/Documents%20and%20Settings/Mamboo%20Jamboo/Desktop/transfer%20text%20to%20html%20textbox/index.html

so my code goes this way:

Private Sub Form_Load()
WebBrowser1.Navigate ("file:///C:/Documents%20and%20Settings/Mamboo%20Jamboo/Desktop/transfer%20text%20to%20html%20textbox/index.html")
End Sub

Everytime the “Command1” button is press the text area with an id name “content” will get all the text from the Visual Basic text box. To make it simple, the idea goes like this:

HTML <---------------------------------- Visual Basic 6
TextArea(“content”) gets the value of TextBox(“Text1.Text”)
Read more
 

Topic Central Copyright © 2011 -- Template created by O Pregador -- Powered by Blogger