Monday, May 28, 2012

CHINA PHONE GPRS | How to setup for GLOBE, SMART, and SUN

,
It has been a while since I updated this blog and now I am back and today I am going to help you how to setup your CHINA PHONE GPRS with SMART, GLOBE and SUN simcards so you can access internet using this kind of mobile gadget.

Before you go through the steps, it is recommended that you need to know or familiarize your China Phone first so you won't get confuse.

DATA ACCOUNT Settings

1. Go to or locate where your DATA ACCOUNT is, then you will be given choices (GSM and GPRS) after you have located the DATA ACCOUNT.

2. After locating DATA ACCOUNT click or choose GPRS.

3. After clicking GPRS you will be given different kinds of GPRS Connection which was already created. You can either create a new one or you can just edit any existing connection.

4. Assuming we choose editing an existing GPRS Connection. Just click any existing connection then press EDIT.

5. Create an ACCOUNT NAME (you can use any name you want). As for me I am going to name it “MY GLOBE GPRS” since I am using Globe mobile simcard.

6. Set the APN (Access Point Name) to
  • www.globe.com.ph  for GLOBE
  • smart1 for SMART
  • wap for SUN
APN is a configurable network identifier used by a mobile device when connecting to a GSM carrier.

7. Just leave the USERNAME and PASSWORD blank.

8. Set AUTHENTICATION TYPE to NORMAL.

INTERNET Settings

1. Go to or locate your INTERNET SETTINGS

2. Then click EDIT PROFILE

3. Almost all CHINA PHONES are dual sim so after clicking EDIT PROFILE, you will be given two choices of what sim you are going to edit. Mostly, SIM1 is the common sim used for internet connection so let us go with SIM1. Note: You can also use SIM2, it is all up to you.

4. After choosing a SIM you will be given a list of GPRS Profile you want to choose. These profiles were already created so select any profile and press OK.

5. After clicking OK, you will be given two choices whether to ACTIVATE PROFILE or to EDIT the selected profile. In this case we are going to edit the profile first so we can link it to our DATA ACCOUNT so choose EDIT PROFILE.

6. Name the profile (you can use any name you want). As for me I am going to name it “MY INTERNET”.

7. Set the HOMEPAGE
  • Globe Homepage: http://www.globe.com.ph/globe.asp
  • Smart Homepage: http://wap.smart.com.ph
  • Sun Homepage: http://www.suncellular.com.ph
8. Locate the DATA ACCOUNT we created a while ago which is “MY GLOBE GPRS”.

9. Set the CONNECTION TYPE to WAP

10. After setting the connection type to WAP, set the IP Address to
  • 203.177.42.214 for GLOBE
  • 10.102.61.46 for SMART
  • 203.138.159.78 for SUN
11. Set the USERNAME and PASSWORD to blank.

12. Then ACTIVATE the profile.

13. Start the internet using SIM1 and done.

Feel free to ask if you have any clarification about the steps.
Read more

Tuesday, August 23, 2011

The Sonic Producer Produce Music and Make Beats

,
What is SonicProducer?

SonicProducer is an incredible cutting edge music sequencer with mp3 export capability. SonicProducer also features music production tutorials with different keyboards, studios as well as tutorials on how to use the Sonic Producer application. All this is available online through the "members area" and contains everything including the software, sounds and the system of video lessons and documentation.

Will SonicProducer work on my computer?

Yes. SonicProducer works on all computers and operating systems. It does not matter if you have a PC, Mac or other platform. If you have any troubles using the sequencer, drum machine, playing videos or entering the members area, simply send my staff an email and we will be glad to help out right away!

Read more

Monday, August 22, 2011

How did Google know you are using Linkreferral

,
There are many bloggers out there who were totally wiped out from Google Adsense because of using traffic exchange sites like Linkreferral. I too was wiped out years ago because of same reason.

As we know, Google is very keen when it comes to their TOS and in that TOS using traffic exchange program is strictly prohibited. They always make sure no one is cheating so they made this feature in Google Webmaster Tool that is pretty useful in our part as a blogger at the same time an advantage to Google. This feature is called "Links to your Site" which allows us to know if our site is being used by another site through links.

Example:

Once you link your site to Linkreferral, Google Webmaster Tool will automatically detect that in a few days if you are constantly receiving traffics from Linkreferral. Google is very much in control to all our Google accounts so they definitely know everything what’s in our Google accounts.

But whatever Google’s decision about using Linkreferral, lots of bloggers and site owners will keep using Linkreferral because of its ability to promote. You cannot just receive traffic from Linkreferral if you are not active in making reviews and comments to other sites which is what makes the site very popular. Comments and Reviews are the life line of our sites and blogs, without it, you are just wasting time and effort. Linkreferral might be a traffic exchange program if others thought about that way, but the important thing is that, it does not give you non-sense traffic or I call it “pass-by traffic” like auto surf or manual surf (easyhit4u, HitSafari, HitBooster, and etc.) does.
Read more

Thursday, August 4, 2011

How to lose stomach fat | The effective way to lose stomach fat

,
There are many programs, tutorials, trainings, books, and products out there that promote about loosing stomach fat. Some of them are effective and some are not but most of them are quite expensive like:

•    Going to the gym paying membership fees that cost you hundreds of dollars or more.
•    Buying exercise CDs and DVDs.
•    Buying books and exercise tools.
•    Buying slimming tablets and drinks and so on.

I would like to go directly to what the topic is all about. There are 4 effective ways to lose stomach fat which cost you very less amount of money and these are:

1.    Walking and Jogging
2.    Water
3.    Fresh Fruits and Vegetables
4.    Less Carbohydrate

Walking and Jogging – Walking and Jogging for 1 to 3 hours a day will give you a good result. This will burn all the fats especially in your stomach faster than you think and it will give you a much good result if you do this before breakfast since there is nothing to burn but your fats. After doing walking and jogging, you always feel this burning sensation around your body which gives you an idea that it worked. You don’t have to go to the gym just to do walking or jogging, you can always to this on the street or anywhere you want to.

Water – Make sure you drink 8 glasses a day to maintain your metabolism and if you do walking and jogging, make sure you always bring water with you to refuel your body.

Fresh Fruits and Vegetables – These will give a healthier and lighter feeling since it stays longer in your stomach which means you will not be craving food all the time plus it will keep you stay away from cardiovascular diseases.

Less Carbohydrate – do not eat too much Carbohydrate because it will give you a heavy feeling and a bigger stomach. Too much Carbohydrate will also help develop those “baby fats” in your stomach, waist, and hips.

You have to remember that the only key to lose those fats is “Discipline” and if you do these 4 effective ways and maintain discipline to your self, I am sure you achieve the body you want in no time.

I would like to share to you that my waist 2 months ago measures 36” and now it is only 29” and I am planning to maintain this number as long as I can.
Read more

Monday, March 7, 2011

How to Troubleshoot an OCX file error?

,

What is an OCX file?

An OCX is an Object Linking and Embedding (OLE) custom control, a special-purpose program that can be created for use by applications running on Microsoft's Windows systems. OCXs provide such functions as handling scroll bar movement and window resizing.

If you have a Windows system, you'll find a number of files in your Windows directory with the OCX file name suffix. Object Linking and Embedding was designed to support compound documents The Windows desktop is an example of a compound document and Microsoft used OLE to build it. OLE and the Component Object Model , a more general concept that succeeded OLE, support the development of "plug-and-play" programs that can be written in any language and used dynamically by any application in the system. These programs are known as components and the application in which they are run is known as a container. This component-based approach to application development reduces development time and improves the program capability and quality.

Windows application development programs such as PowerBuilder and Microsoft Access take advantage of OCXs. Microsoft now calls an OCX an ActiveX control, the component object under Microsoft's set of ActiveX technologies, of which the fundamental concept is the Component Object Model and, in a network, the Distributed Component Object Model (DCOM). An OCX or ActiveX control is actually implemented as a dynamic link library DLL module. (You can think of a DLL program as a "subprogram" that can be used by any number of application programs, each of which is a "container" for the DLL or OCX/ActiveX control "object.") Visual Basic and C++ are commonly used to write OCX or ActiveX controls.


How to Register an OCX file in Windows XP?

1. Go to C:\WINDOWS\system32 and see if the ocx file you need is already there, if not then download it  on the internet. Let say you want to register comclt32.ocx, if you already have comclt32.ocx make sure you place it inside C:\WINDOWS\system32. Click Start > Run > and type this: regsvr32 comctl32.ocx


Successful Registration:


How to register an OCX file on Windows Vista?

1. Click the Windows logo, point to "All Programs" then "Accessories." Right-click on "Command Prompt" and select the "Run as Administrator" option.

2. Enter the command "regsvr32 %Systemroot%\System32\comdlg32.ocx" at the command prompt, where %Systemroot% is the folder in which Vista is installed (usually "C:\Windows").

3. Wait for the system to confirm the registration with the message "DllRegisterServer in C:\WINDOWS\System32\comdlg32.ocx succeeded." Reboot the computer to make sure that the registration is complete.

Source: EHow
Read more

Monday, February 28, 2011

Connect Visual Basic 6 to Microsoft Access 2003?

,
In this topic I am going to show you the simple way on how to connect Visual Basic 6 to Microsoft Access 2003. First you need to make sure that you have DAO 3.6 Object Library in your References.  Click or check it then click OK.

Open Visual Basic 6 > Click Project on the menu bar > References > Look for DAO 3.6 Object Library

DAO stands for Data Access Object which is already included if you install Microsoft Office 2000 and 2003. To know what Data Access Object is available in your computer, just look at the References.

Visual Basic 6 References

As you can see I have two Data Access Object (DAO) which are available in my computer, DAO 3.6 for Microsoft Access 2000 to 2003 and DAO 3.51 for Microsoft Access that is below 2000 like 98 or 95.

Code on how to connect Visual Basic 6 to Microsoft Access 2003:

con.ConnectionString = "Provider=Microsoft.Jet.OLEDB.4.0;Persist Security Info=False;Data Source=" & App.Path & "\data\database.mdb"

The Microsoft Database Access is located under a folder “data”.


Note: Always check the Visual Basic 6 references

So I hope this topic helps you. Please post a comment if want to ask something about this topic or if you have problems.
Read more

Sunday, February 27, 2011

CSS in Dreamweaver Customize Web Button and Text Field

,
To do this, open your Adobe Dreamweaver.

1.  Create a Button and Text Field by Clicking the Button and Text Field in the “Form Tab”.

2. After clicking the Button and Text Field put an ID using any ID name you want and press OK and do the same to both Button and Text Field.

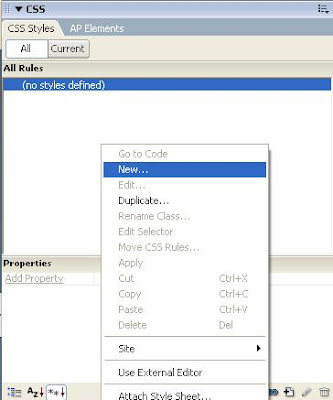
3. After creating a Button and Text Field, Go to CSS Panel Group > Click CSS Style Tab > Click All Button (Show All Document Mode). See Image below:


4. On the Style Definition Area, Right Click and Select “New” to create a New CSS rule, a New CSS Rule Window will appear.


On the New CSS Rule window follow the image below:


Click OK and Save the New CSS File using any filename you want.

5. After Clicking Save Button, a CSS Rule Definition Window for the Selector Name you typed will appear. In this project, I put “.fieldbuttonstyle” as my Selector Name. It is very important to put a “dot(.)” before the selector name in customizing buttons, fields, and other FORM OBJECTS. Below is the CSS Rule Definition Window Image.


This is where you can put different styles on buttons and fields like font style, border, font size, background color, images, alignment, and so on.

Let say:

FONT STYLE: Arial, Helvetica, San-Serif
FONT SIZE: 12 pixels
BACKGROUND COLOR: #0066FF
BORDER:  SOLID(Top, Right, Left, Buttom), WIDTH(Thin), COLOR(#CC6600)

After setting up the definition click “OK” button.

6. To apply the CSS Style, click the button or text field then on the bottom part, in the Property Panel, click the Class Drop Down Box and select the Selector Name you created. See Image Below:


7. After applying the CSS Style, click Save and Run the Project by Clicking F12 and you will see something like this:

Read more

Wednesday, February 2, 2011

Pencil Portrait Mastery Book Step-by-Step Guide

,
Discover the Secrets of Going Beyond the next whole new 'Real Master Level' of Drawing Realistic Pencil Portrait at the Top that Artist in the World Rarely reach.

Realistic Pencil Portrait Mastery is a step-by-step guide that help you to achieve dream to become a master pencil artist without wasting your precious time going through years of trials and errors.ANYONE can learn to draw a realistic pencil portrait regardless of their current talent, skills, and techniques.

You will get this 12-Weeks Pencil Portrait Mastery Exercises that are designed to help you get the MOST out of this home-study course.

Inside these exercises, you will find even more information that are revealed to you in the home-study course. They are only 1-6 pages in each exercises but they cover the MOST IMPORTANT METHOD that you need to know for drawing realistic pencil portraits.

The exercises are divided into 3 stages for every 4 weeks. From stage 1 beginner level in the first 4 weeks, stage 2 intermediate level in the following 4 weeks, to stage 3 the "real master level" in the last 4 weeks.

Trust me, if you complete them, you will be well on the way to becoming a “real master.” As a matter of fact, if you just follow and complete these exercises without learning from the home-study course, you will still see tremendous improvement in drawing pencil portraits.

And the best thing is, you don’t even need to spend a few hours a day on them. Each exercise only takes 15-30 minutes a day.

The skills that this Realistic Pencil Portrait Mastery home-study course will help you build will make you proud. Just look at all the lessons and bonuses that this guide prepared for you.

From today, you no longer have to keep practicing the same way, and getting the same results.

And I'm NOT talking about drawing a decent pencil portrait, I'm talking about a lifetime skill of drawing realistic pencil portraits like a master.

You’re getting a road map to get you right to the "real master level" even faster than I did without months and years of trials and errors.

Before:

 After:

Samples:


Read more

Wednesday, January 19, 2011

Beats 360 Hip Hop and Rap Beats | The Worlds Biggest Hip Hop Music Library

,
Beats365 Members can download hundreds of Tracks, Beats, Instrumentals, Hundreds of Sound effects, Nature Sounds, Instrument Sounds and More, anytime they want, as well as market their music to record labels, distributors, and license individual tracks and music that Champ Entertainment creates and posts on Beats365. An affordable one-time fee will apply in order for you to become a member, it is quick, easy and powerful.

Your Registration gives you full access to:

Every Rap beat, Audio Clip, Hip Hop, R&B and Reggae Instrumental on this site, Beats365 - Hundreds upon hundreds of the hottest beats and instrumentals, including ALL of the beats available for preview on the search feature, and more! 100's of Beats and new beats uploaded to the database! Download Beats365's royalty free beats easily. Use them however you like!

Sound effects, drums, guitars, strings, and synths - 1000's of the hottest sounds that we use to make beats, including original drum sets, strings, sound effects, backgrounds, audio snippets and more!

Industry listings database - We have had 20+ years in the industry and have gained access to the the worlds most exclusive and exquisite industry conferences, parties and directories, only to present all the information to our members.

Beats365 Community - 3000 members have benefited from our industry insight, and as a member you can plug into the most powerful resource for independent artists!

Read more

DUBturbo: The Beat Maker Software

,
DUBturbo is Marked As The Most Controversial Beat Maker On The Market because It Does 10 x As Much While Costing 10 x Less Than Other Beat Maker Software. DUBturbo is made for all levels.

It doesn't matter if you've never made beats before, or if you haven't touched a sequencer in your life, because as of right now - you're starting the transition from novice - to billboard level hit making producer!

You'll be making hits within minutes because ALL the drums and instruments are HOTTT! It's not just one bar or a quick looper, and not just 1 sound x 16 tracks. Actually, I forgot an important part - you can import unlimited amounts of your own sounds (just add any .wav file and parse it - we'll show you how). If it sounds confusing or you don't get it yet - it means the combos & audio possibilities with DUBturbo are literally UNLIMITED!!! You can't go wrong today, and your customer satisfaction is literally guaranteed or your $ back!

If you want to make real studio quality beats that literally make you get out of your seat and dance when you play them - this is it! It's Easy Enough For Newbies & Flexible Enough For The Pro's!

When you order DUBturbo today you also get a full video training course which takes you through DUBturbo in detail - and we also show you how to structure music including urban flavor beats - properly - STEP BY STEP!

For those that are BRAND NEW to our world, we DON'T leave you hanging, don't worry! In fact - You'll be choppin' amazing beats in no time we promise

BRING THE HEAT to your crew during your next session, play your track for them & I betcha you'll have them all goin'.. "WOW - who made THAT beat?"


Read more

Sunday, December 5, 2010

Best and Recommended Traffic Exchange Site for Beginners

,
If your blog or website is new, your first problem might be traffic, how to get viewers? It is a common problem if you are new to blogging, or online business. My best recommended traffic exchange site is LinkReferral for 3 reasons:

Reason 1: Site Review and Ratings – This is one of the features of LinkReferral where you can get ratings, feedback or comments from other people based on the performance of your website or blog. There are four criterias to consider in reviewing a website or blog, first, easy to navigate, second is the relativity of your blog or website to the category, third is how fast your site or blog loads, and the fourth is the originality of your content. It is really fun and it feels good everytime you receive good comments and ratings. What I like about this feature is you will really know the problem of your website or the strength and the weak part of your website or blog.

Reason 2: User-Friendly and Fast loadingLinkReferral site is very easy to use and very easy to understand plus it loads fast. All you have to do once you are registered in LinkReferral is:

1.    Login
2.    Click Traffic Directory
3.    Select and Click a Category you want
4.    Visit a website or blog from other people. You need to visit atleast 30 blogs or websites you want.
5.    Do atleast 5 reviews on the website or blog you like.
6.    Post one topic on the forum page.
7.    Choose your favorite website or blog atleast one.
8.    Done!


Reason 3: Easy Ranking – Once you completed the four requirements you will be rank first, second, or third on category you choose for one day. You have to do this everyday to get more viewers to your blog or website.


I hope this topic helps other people who are new to online business and don’t know how to get traffic and viewers to their sites.

free web site traffic and promotion
Read more

Thursday, December 2, 2010

Increase your website or blog traffic by just playing Facebook games

,
Facebook is one of the biggest and famous social media site in the internet. There are millions of users around the world who are using Facebook so imagine the amount of visitors you can have with this website.

In this topic we will be talking about one of the features of Facebook that can increase your website or blog traffic / visitors, and this is the “Game Achievement Sharing Feature”. I don’t know what others call this but I am going to call this “Game Achievement Sharing Feature”.

This is one of cool features of Facebook where you can share your game achievements to your friends. All you have to do is to play games like Mafia War, Farm Town, Farm Ville, and so on. Everytime you level-up, get bonuses, or achieve something, you will be given an opportunity to announce or share your achievements to your friends. Above your achievement information, there is a text area where you can write anything you want. See image below:

Level-up:

Bonus:

Share / Publish:

Take advantage with this feature and increase your traffic while having fun.
Read more

Tuesday, November 30, 2010

Visual Basic 6 Add, Edit, Delete, and Clear Records

,
If you are handling database add, edit, and delete are the common functions that you need to know and understand.

I am going to show you the simple way on how to create these functions in Visual Basic 6 using MS Access 2003 database. I am also going to add clear function which is use to delete all the records in the database in one click.

In this topic it is very important that you already know about How to connect Visual Basic 6 to Microsoft Access 2003, and the fundamentals of Visual Basic 6 and SQL code.

Add Function:

With rst
    .ActiveConnection = con
    .CursorLocation = adUseClient
    .CursorType = adOpenDynamic
    .LockType = adLockOptimistic
    .Open "Table1"
End With

With rst
    .AddNew
    .Fields!input = Trim$(StrConv(Text1, vbProperCase))
    .Update
    MsgBox Text1.Text & " Successfully Saved", vbInformation
End With

rst.Close
Set rst = Nothing

Edit Function:

rst.Open "select * from Table1 where id=" & Trim$(Label4.Caption) & "", con, adOpenDynamic, adLockOptimistic

With rst

    .Fields!input = Trim$(StrConv(Text1, vbProperCase))
    .Update
    MsgBox Text1.Text & " Successfully Edited", vbInformation
End With

rst.Close
Set rst = Nothing

Delete Function:

With rst

    .ActiveConnection = con
    .CursorLocation = adUseClient
    .CursorType = adOpenDynamic
    .LockType = adLockOptimistic
    .Open "Select * from Table1"

End With

With cmd

    .ActiveConnection = con
    .CommandType = adCmdText
    .CommandText = "delete from Table1 where id=" & Trim$(Label4.Caption) & ""
    .Execute
    MsgBox Text1.Text & " Successfully Deleted", vbInformation
End With

Clear Function:

With rst

    .ActiveConnection = con
    .CursorLocation = adUseClient
    .CursorType = adOpenDynamic
    .LockType = adLockOptimistic
    .Open "Select * from Table1"

End With

With cmd

    .ActiveConnection = con
    .CommandType = adCmdText
    .CommandText = "delete from Table1"
    .Execute
    MsgBox "Database Clear!", vbInformation
End With

The codes are simple and easy to understand. The only complicated parts are the edit and delete functions because we need to select the “id” of its input in order to execute edit and delete function properly. By using “id” which is our table primary key, we can edit and delete a record from the database specifically. Which means, if you have ten inputs in your database with the same value, you can specifically edit and delete one record; whereas if you use “input” instead of “id”, all the records with the same value will be edited or deleted?

You can download the whole program here: How to create add, edit, delete, and clear records from Microsoft Access 2003 Database


I hope this topic helps. Please post a comment if you have some problems or clarification.
Read more

Monday, November 22, 2010

Visual Basic 6 Tutorial Remove Spaces in a string using Trim

,
In this topic I am going to show you how to remove left space, right space, right and left spaces and all spaces in a string in Visual Basic 6.

In removing spaces in a string, all you need to do is to use “Trim” and “Replace” function. This is very important if you are dealing with databases.

Application:

If you have an input let say Company Name and you want the Company Name to be unique which mean no duplicate allowed. If you are not going to trim your input the tendency is it will create an error or the “no duplicate rule” will not be applied. Here is the reason why:

Assuming I already have Google Company in my database and I want no duplicate, if I input “_Google_Company_ _” it will also be accepted in the database because by putting spaces in the first and the last part of the string tells that they are not equal. To make it equal you have to use Trim.

Trim$(Input.text)

This will remove spaces both first and last part of the string. Here is the code.


Private Sub Command1_Click()
Text2.Text = LTrim$(Text1.Text) 'This will remove Left space or the first space
Text3.Text = RTrim$(Text1.Text) 'This will remove right space or the last space
Text4.Text = Trim$(Text1.Text) 'This will remove space both first and last
Text5.Text = Replace(Text1.Text, " ", "") 'This will remove all the spaces
End Sub
You can download the whole program here.

Screenshot:


Remember, this tutorial is very important in storing and retrieving data from database. This will help you compare two strings properly.

Microsoft Visual Basic Professional 6.0 with Plus Pack Microsoft Visual Basic 6.0 Learning Edition Microsoft Visual Studio 6.0 Professional Edition Microsoft Visual Basic 6.0 Enterprise Edition Development System Microsoft Visual Basic Professional Edition Mastering Enterprise Development Using Microsoft Visual Basic 6.0
Read more

Thursday, November 18, 2010

Increase Google Adsense Click Through Rate - Adsense Tips

,
Increasing Google Adsense Click Through Rate is one of the important thing if you want to increase your Adsense revenue. There are many things you need to consider if you want to increase your Adsense click through rate and based on my research these are the common tips I found:

1. Ads Positioning - right placement of ads can increase your adsense click through rate. You can place your ads above, below, within, left, or right part of your post.

2. Get Rid of Public Service Ads - public service ads are ads that gives nothing when clicked. They just show up if there are no more ads to display. Read How to Remove Public Service Ads from your Blog or Website?

3.  Rich Text Page - the content of the page must have a minimum of 400 words. If you can write more than 400 words the better.

4. Choose high paying keywords - If you to write something let say about "software", use a high paying keywords that is related to the keyword software like "Payroll Software", "Mortgage Calculator Software" and so on. Use Google Adword Keyword Tool to find nice high paying keywords.

5. Avoid putting title on ads - do not put titles on ads like "Sponsored Links", "Links", "Menu", and so on because you are violating Google TOS. If you violate Google TOS they will give you 0% CTR.

6. Ads Color - make sure that your ads are well blend to the color of your site. If you have a white color site then your ads must have a white background and a white border.

7. Right Ad Size - based on the surveys 336x280, 300x250, 250x250, 160x600, and 728x90 are the best performing ads so better use them.

All seven steps are the common tip you can find on the internet but I have also found another information on how to increase adsense click through rate and according to his experience he was able to increase his Adsense Click through rate from 1.4% to 6% with just two changes.

1. Use image ads!
2. Place two 300x250 ads side by side directly above the main content.

Read the whole content here.

And these are the things I have observed,  adsense click through rate depends on the value of ads appeared on your page. We have to remember that each ads has its own value and high value ads will only appear if you use high value keywords (high paying keywords). But no matter how high the value of keywords you use and the value of ads appeared on you site, if have less traffic and no clicks, your click through rate will not increase.
Read more

Wednesday, November 17, 2010

Payroll Software

,
The term "payroll" mean the sum of all financial records like employee salary, wages, bonuses, and deductions. It encompasses every employee of a company who receives a regular wage or other compensation.

In a company, there are employees who are paid a fix salary and there are employees also who are paid for hours worked or the number of items produced. All of these different payment methods are calculated by a payroll specialist then the appropriate paychecks are issued.

In accounting, payroll refers to the amount paid to employees for services they provided during a certain period of time.

Payroll plays a major role in a company for several reasons:

Accounting Point of View:

payroll is crucial because payroll and payroll taxes considerably affect the net income of most companies and they are subject to laws and regulations (e.g. in the U.S. payroll is subject to federal and state regulations).

Business Ethic Point of View:

Payroll is a critical department as employees are responsive to payroll errors and irregularities: good employee morale requires payroll to be paid timely and accurately.

The primary mission of the payroll department is to ensure that all employees are paid accurately and timely with the correct withholdings and deductions, and to ensure the withholdings and deductions are remitted in a timely manner. This includes salary payments, tax withholdings, and deductions from a paycheck.

What is Payroll System Software?

Payroll System Software is a computer application that allows you to manage your employee payroll services in a most accurate and easy way. Today, there are lots of Payroll Software in the internet and my job is to collect some of the best Payroll Software out there.

1. Intuit Online Payroll - Payroll for Small Business - it is one of the best payroll software in the internet that offers 30 days free trial + 2 months more at $9.99. Intuit Payroll is easy to use, low cost, and it is packed with everything you need that is why they have over 1 million business users. They also have Payroll Software for MAC. For More Information Visit Intuit Small Business Rejoice.


2. Peachtree Pro Accounting with Payroll 2011 - it is a product from Sage that provides the tools to manage your essential accounting tasks easily and accurately, along with an in-house payroll solution. This software makes it easy by providing you with the tools to help keep your payroll on time and accurate. It automates invoices and checks, record customer payments, create budgets, and track sales, inventory, and expenses. For More Information Visit Sage Software Peachtree Pro Accounting with Payroll 2011.

3. Payroll Software - Payroll Mate 2010 - Payroll Mate® is a comprehensive payroll software that fits the needs of accountants and small to medium size businesses. Payroll Mate automatically calculates net pay, federal withholding tax, Social Security tax, Medicare, state and local payroll taxes. Payroll Mate also supports different types of payroll pay periods, prints checks, prepares payroll forms 941, 944, 940, W2 and W3. This payroll software also supports user-defined Income, Tax, and Deduction categories making it very flexible and powerful. To Read More and Download the free trial Visit Payroll Mate 2010.

4. Ame Small Business Payroll - Ame Small Business Payroll is a Payroll Software suitable for any type of business, Saves dollars on payroll outsourcing, Print checks on your computer, eliminate need for preprinted check stock with optional MICR, Check Printing module, and Go green and save time with optional Direct Deposit module. Click here if you like the software.

Amazon Offers:
Read more

Monday, November 15, 2010

Starting CSS in Dreamweaver

,
To start with CSS in Dreamweaver, we must open our Adobe Dreamweaver application first. Adobe Dreamweaver is a web page editor that allows you to create and edit different kinds of web pages like PHP, HTML, CSS, JAVA Script, ASP VBScript, XML, Cold Fusion, JSP, and many more. This tool is very powerful yet easy-to-use because of its drag and drop function and it is also equipped with cool tools and plugins like flash button, flash video, flash paper, and a lot more which can easily be inserted into your web page.

The Figure 1 below shows the start of Adobe Dreamweaver where you select what web development language you want.
Figure 1. Start of Dreamweaver

The next step we need to do is to open HTML on the Create New column. We need to remember that in using CSS to format a page, we need to consider two separate things “content” and “presentation”. The content of your page—the HTML code—resides in the HTML file and the CSS rules defining the presentation resides on another file an external style sheet or sometimes in another part of HTML document usually at the head section. Figure 2 shows CSS rules which are placed in another file with a “.css” extension (external style sheet). Figure 3 shows CSS rules which are placed inside an HTML file inside head tag.

Figure 2. CSS rules in another file.

Figure 3. CSS rules inside HTML file

After opening HTML, you will see a blank white page. Now there are four important areas that must be visible in the working area. These are the area you will be using always in creating a web page using CSS. See Figure 4.

Figure 4. Four important areas in creating web page using CSS

Area 1 – This is the area where you can add objects to your page like buttons, images, flash objects, iFrame, and many more. In formatting a page using CSS we will be using “Div Tag” which is found in the common tab. See Figure 5 below:

Figure 5. Div Tag under common tab

Area 2 – Area 2 is the area where you can add CSS rules after inserting a Div Tag. This area can be enable or disabled in the Window menu bar, click Window on the menu bar > Check or Uncheck CSS Styles.

Area 3 – This is the area where you can align text, set link property, set text color, set background color, set font style and size and so on in the whole page. This area will play an important role along the way of your project.

Area 4
– This is the area where you can save, open, and create new projects. You can also print, cut, copy, paste, and undo or redo your codes if you want.

You need to remember the four areas of Dreamweaver in creating Web Page using CSS.
Read more
 

Topic Central Copyright © 2011 -- Template created by O Pregador -- Powered by Blogger